What is it?
The ribbon bar is the primary location of most functions/options that you can use and its broken into 6 sections. We will cover these sections below one at a time
Why does it matter?
To become efficient at navigating and using PQD to its fullest extent, knowing and understanding the ribbon bar and all of its features is extremely important
How does it work?
Templates
There are 4 buttons under the Templates section:

Template Library - The first button allows you to choose the template library to be used for your template selection, you could have only 1 installed or you have the ability to install multiple template libraries. For example, 16x9, 4x3, Portrait, etc.


Template Selector - The second button allows you to choose the template style you would like to use when creating your presentation

Add Template - The third button allows you to add the selected template to a new slide

Update Template - The fourth and final button on the Templates section of the ribbon bar allows you to update the current slide with the selected template
Drawing
There are 3 buttons under the Drawing section:

Edit - The first button allows you to take a drawing that is on a slide into Edit mode where you can change up your drawing to suit your needs

Save Copy - The second button allows you to Save Copy the current drawing on the slide to its own powerpoint file, then replace the current drawing in the template with your new copied version which makes things easier and removing clicks to add this new drawing to your template

Duplicate - The third and final button under the Drawing section of the ribbon bar is to Duplicate the current drawing which is similar to save copy but instead of replacing the current drawing that you are copying it will place that new drawing in the next available slot in your template thus increasing the speed in building out your presentation
Presentation
There are 3 buttons under the Presentation section and each of these buttons have 3 more specific options below them, you can find the explanations below:

Refresh - The first button is used to Refresh the current drawing in your template, so if you made an edit offline you can update the drawing in the presentation to match the latest version.

Refresh: Selected Drawing - This option will only refresh the drawing in the template you have selected
Refresh: Slide Drawings - This option will refresh all drawings on the currently visible slide. If this is a multi-slide presentation other slides will not be affected by this choice
Refresh: Presentation Drawings - This option will refresh each drawing on every single slide in your presentation in one click of a button - ensure you want to refresh every single drawing before clicking

Flip Vertical - The second button is used to flip the drawing vertically in your presentation, and you can apply this to the selected drawing.

Flip Vertical: Selected Drawing - This option will only flip the drawing in the template you have selected
Flip Vertical: Slide Drawings - This option will flip all drawings on the currently visible slide. If this is a multi-slide presentation other slides will not be affected by this choice
Flip Vertical: Presentation Drawings - This option will flip each drawing on every single slide in your presentation in one click of a button - ensure you want to flip every single drawing before clicking

Flip Horizontal - The third and final button under the Presentation section of the ribbon bar is used to flip the drawing horizontally, which functions the same as Flip Vertical but mirrors the drawing left to right instead of top to bottom.
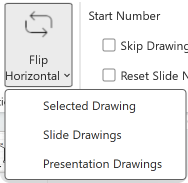
Flip Horizontal: Selected Drawing - This option will only flip the drawing in the template you have selected
Flip Horizontal: Slide Drawings - This option will flip all drawings on the currently visible slide. If this is a multi-slide presentation other slides will not be affected by this choice
Flip Horizontal: Presentation Drawings - This option will flip each drawing on every single slide in your presentation in one click of a button - ensure you want to flip every single drawing before clicking
Numbering
There are 4 functions under the Numbering section on the ribbon bar and they are start number, skip drawing numbering, reset slide numbering and reset numbering on all slides - these options all have to do with templates that have numbers or count built in

Start Number - This allows you to begin your next sequence at whatever number you choose, for example lets say you are using a numbering system in your playbook, all of the plays numbered in the 60s are quick pass game and your drop back plays will start with 70, but you only have 8 quick pass plays. You could enter the start number at 70 and add your template to a new slide and it will begin at 70 to keep things organized.
Skip Drawing Numbering - This is used when you are using a template with multiple drawings, lets say a 4-up and you dont want to count each drawing because some are similar, you would select the skip drawing numbering and then add your next drawing to the template and there will not be a number associated with the drawing. Then when you add your next drawing the numbering will continue in the correct order.
Reset Slide Numbering - This is used when you numbering gets out of order due to manual moving of slides around your presentation, if you use the reset slide numbering option it will renumber all drawings on that slide in the proper order starting with 1 or whatever number is in the start number box
Reset Numbering All Slides - This is the same as reset slide numbering however instead of only doing that slide it will renumber all drawings on each slide in your entire presentation to give a perfect flow and proper order
Quick Settings
Right now there is only one setting under the Quick Settings section of the ribbon bar and that is Remove background on add

Remove Background on Add - This is used when you have a play in your playbook that has the field background in place but you want to remove the background prior to adding it to your template. Instead of editing the drawing to remove it, you simply click this box before adding to your template. This is helpful when are adding plays to a wristband template and the drawings are smaller to give more space
File Management

There are 2 buttons currently under File Management. Export and Utilities
Export - Primarily for Visio users to be able to export their files to PowerPoint but also very helpful in exporting your presentations to PDF documents or even image files
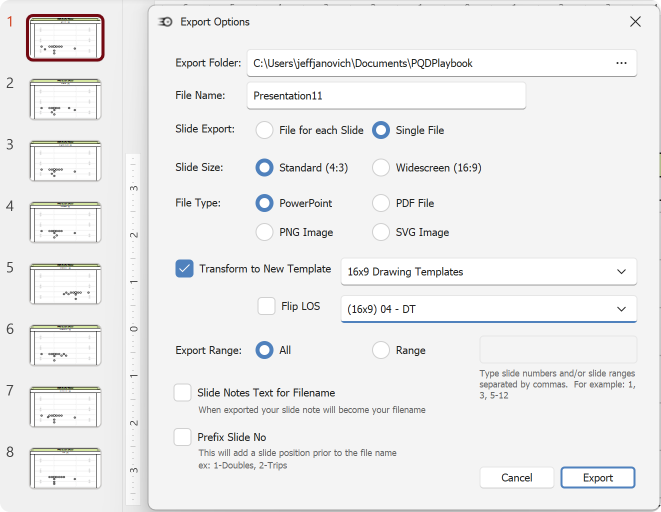
In this example, I’m using Export to take eight single 1‑box slides and convert them into a 4‑box template for my presentation. I select Export, choose the folder you want to export the file(s) too, give it a new name, choose single file or file for each slide, choose Transform to New Templates, and then select a 4‑box DT template. I also choose to export everything into a single file that I can share or present. Because I’m transforming into a 4‑box template and I have eight drawings, the exported file will contain 2 slides.
Using this export method also allows you to use slide notes text to name files or add a prefix slide no to the filename for easier mapping and sorting
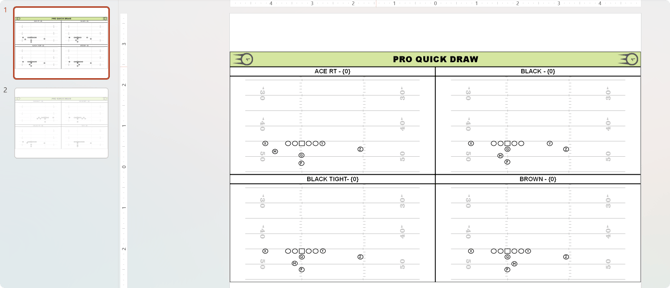
Here is the exported outcome, you can see there are now 2 slides using the 4 box DT template and all 8 of my single slide drawings have been transformed
Utilities

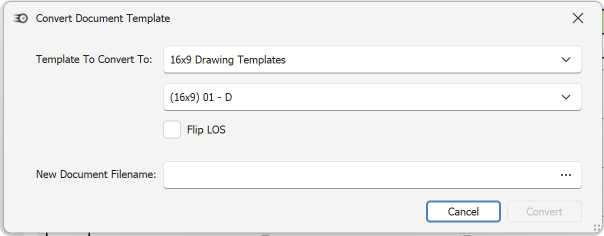
Convert Template - Under the Utilities menu you have Convert Template which takes a Visio file and converts to PowerPoint and make its editable - this is very similar to the export method we showed above to convert your items to a specific template format for presentation, but less customizable options.
Merge Files - This function is great when you have multiple coaches working on one side of the ball, for example on defense you have a group of coaches working on a 3rd down package, one coach handles 3rd and short or medium and another handles 3rd and long and yet another coach is working on the depth chart/scouting report for those scenarios. They are all working independently creating their own files. Merge Files allows you to take all of those files and bring them together for a full 3rd down package and create that full picture